

Category: create.
you’ve got mail… the real kind.
there’s a wonderful mystery to receiving a parcel or letter in the mail. and not just any parcel or letter – it’s the kind that comes from a real person. and with the news of canada’s upcoming postal service change – all the more fitting.
i am one of lucky few who get to open such a package. a package packed by a real person. no machine was used in the making of. the grin that comes across my face is like none other. little notes and treasures hidden among the biodegradable packaging peanuts.
i am, of course, talking about parcels specifically sent from my mother.
when did it all begin? hmm… i believe it was my first year at college. my parents own their own business – Workshop Supply – so naturally, my mom is able to ship things across the country with ease.
i remember feeling so independent the first time i received such a package. i even had to show ID upon picking it up – i’m so grown up i thought.
laundry detergent
a new towel
articles ripped out of magazines
old pictures
were but a few of the items that came inside. 7 years has passed since i moved to toronto and i’m still receiving packages in the mail. last month i opened one up to find a trinket box my grandma had given me long ago, probably lost and then found in my childhood bedroom, some pictures and birthday cards from highschool, a stamp, gold embossing powder, a pin of a christmas present and a tiny note from a friend hidden inside the trinket box. it arrived to my work, finding its way to my desk. (mom, christie – you both sure made my day! thank you again.)

when was the last time you sent something in the mail to someone? i joined a postmark society a little while back, and don’t like to admit that i have yet to send my blogger pen pal a letter. i even have a letter i was supposed to send to someone in Japan back in, oh, i don’t know… JUNE! i’m challenging myself to do both of those things this week, because, who doesn’t like getting mail from a real person! on time or not! i even made both of my grandmas the little package pictured above as their christmas present. stamped january through to december – i will write to them once a month, giving updates on the odd and awesome happenings of my life. i’ve already received a letter from one of them!
i encourage everyone to take the time to send something to someone in the mail. it will be fun for the both of you! fun for you because you get to decide what to send – a package, a postcard, letter, a doodle, whatever you fancy! and if you don’t tell them by text or tweet ahead of time, they’ll come home to a pleasant surprise one day. the unexpected can be fun! just don’t tell them if and when you’re sending it – because if you forget or it gets lost, or the dog eats it… they’ll never be the wiser. classy.
***if you stumbled upon this blog hoping to read about one of my (and i’m sure one of your) favourite romantic comedies – you’ve got mail – then i suggest you head on over to Design Sponge, and check out the post that Amy put together inspired by the film. or just go watch it – because it’s an awesome movie! probably on my top 10 list to be perfectly honest.
Becky Gean and littlesiddallstudios – January 15th, 2014.
learn by doing – popcorn cookies.
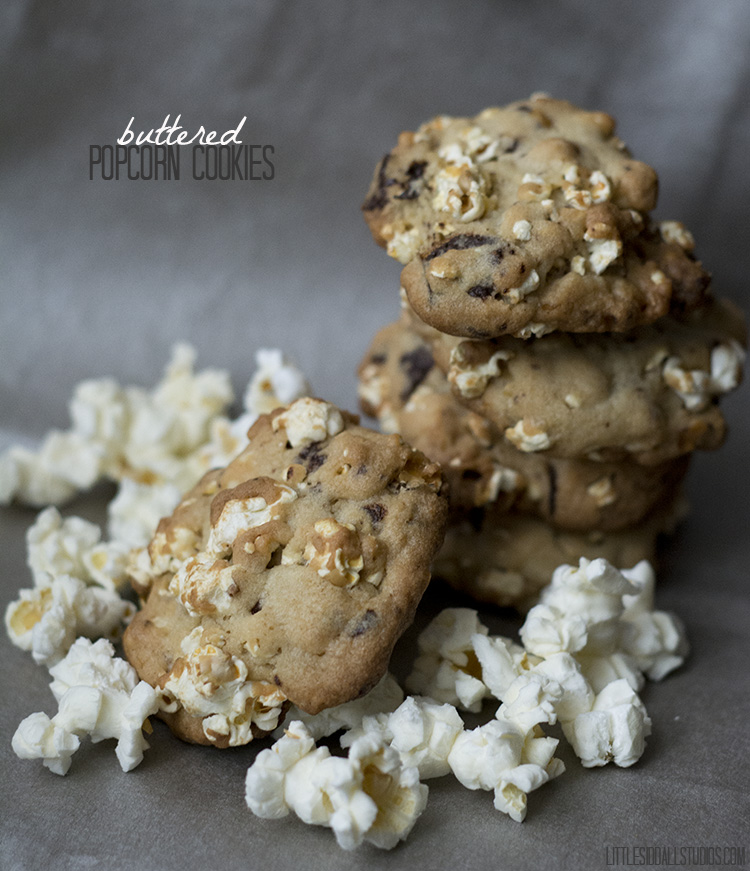

slightly altered from the original recipe found on milk & mode straight out of the smitten kitchen cookbook – i give you the yummiest, chewiest, perfect mix of sweet, salty and crunchy cookie recipe you will ever find – and then hopefully make – and then DEVOUR!
my alterations?
i made the popcorn using this method
added in a cup of toasted walnuts & dark chocolate chunks when stirring in the popcorn
and topped with sea salt just before baking.
they did not last long.
and neither did the second batch. heehee.
now – to figure out a gluten and dairy free version of these so that i can share this goodness with a few friends.
happy baking – wherever you are!
learn by doing – peach and blueberry galette.
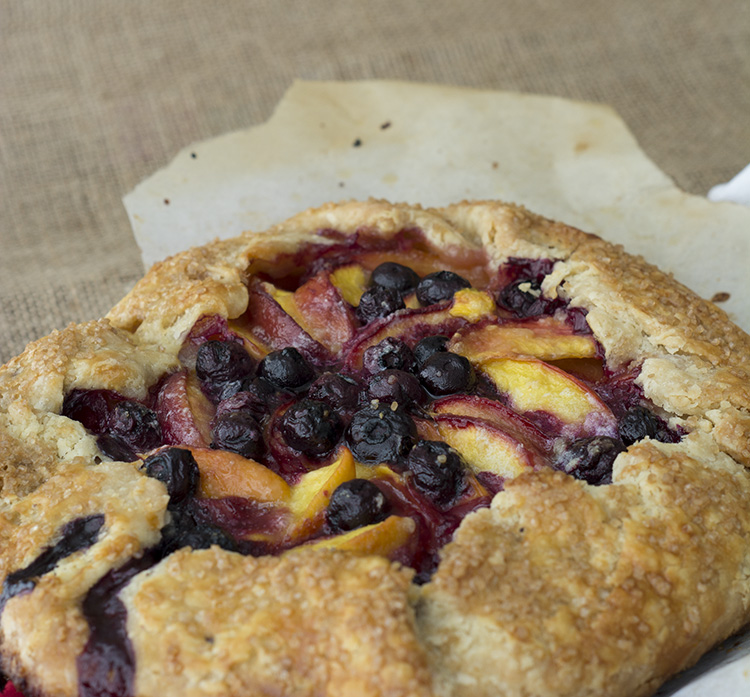

the end of july and well into the beginning of august it seemed that everywhere i looked SOMEONE was making some type of galette. now, i must confess, i had no freaking clue what galette even meant when i started out on this adventure.
the bing dictionary defines galette as,
ga·lette
[ gə lét ]
- round flat cake: a round flat French cake, pastry, tart, or pancake, often filled or topped with jam, whipped cream, cheese, meat, or other foods
alright – simple enough! i have peaches and blueberries from the market. done. let’s do this thing.

from watching way too many chef at home episodes with michael smith in my day, i knew his technique of freezing and then grating butter for perfect flaky pastry and had to try it. now – keep in mind – grating frozen butter is not that easy! try it once and see if you think it’s worth it and then let me know what you decided. it didn’t convert me. this is definitely one of those lazy sunday projects for the amount of it time it takes start to finish.

just the right amount of sweetness from the peaches mixed with the tangy tartness of the blueberries and sprinkled with demerara sugar. yummy perfection.
recipe adapted from martha stewart – peach raspberry galette
a sneak peek – my alt business cards – alt nyc.


for those of you who don’t already know – mohawk and i flew off to new york city this morning.
i will be attending ALT NYC. what is alt? you can read more about it – here.
why am i attending alt nyc? for a bunch of crazy reasons! all to better myself, this blog, and my (so very new) business. and so – when i saw the chance to go to alt nyc – i took it. it’s also an excuse for a mini vacation! it did mean that i would need some business cards though! and let me tell you – business cards are a BIG DEAL at any alt conference. don’t believe me? just google “alt business cards” and see the images that flood your screen. pretty!
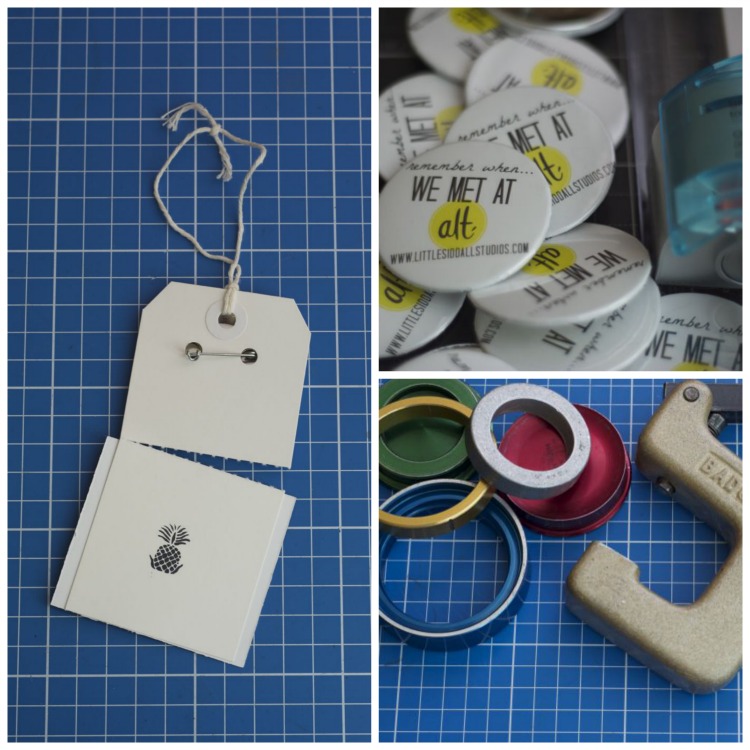
i was able to use up craft supplies (luggage tags and buttons) that i had left over from our wedding for my own business cards. i don’t realistically have the money for gorgeous letterpress… yet. that’ll come. eventually. a girl can dream right?!
i ended with 100 pins and 100 little black square business cards. the luggage tag was a perfect fit to hold both, and the added perforation down the middle allows for the receiver to separate them if they should so choose – leaving them with a business card, and the back for their pin.
steps to complete my alt business cards.
1 – tie string together in a knot
2 – punch one hole on either side of luggage tag for pin securing
3 – glue black cardstock onto luggage tag
4 – stamp pineapple onto backside of luggage tag – dream of eating pineapples – mmm!
5 – attach pin
6 – perforate between black cardstock and pin
7 – get husband to massage hands & arms because they – are – sore, after 100 of these babies!
i’m absolutely thrilled at the chance to meet such creative people all under the same roof. it all kicks off this evening for the bing sponsored dinner at sunday suppers. to tell you that i’m excited would be an understatement. oh – did i not mention – the conference is being held at martha stewart living headquarters. yup – i just said that. jaw. drop. at least – mine did.
NOTE: all pins were handmade using my father’s hand press button maker (thanks dad for letting me borrow it!) the images for the pin & black cardstock were made in word on my laptop, then printed at the local print shop. i fell in love with this 5 in 1 paper-cutter from staples while using it at the office i work at and highly suggest it for any novice crafter. i also used it for all my wedding invites, and now, for the perforating of these cards. awesome, simple machine. finally, the stamp belonged to my mother and has forever been a favourite of mine. (thanks mom!)
learn by doing. a williams-sonoma cooking class. omelettes.

the first thing mohawk said when i walked in the door having just been to a free williams-sonoma cooking class on how to make omelettes was “i’m hungry”.
“great! want an omelette?” was my immediate response. let’s see if i learned anything during the one hour-long demo the store puts on. it was a long hour to have to stand in one spot (my back hates me) but well worth it if i could bang out a killer omelette.
lo and behold – the top picture was my first attempt! yippee! i was so happy with the turn out, i made mohawk wait to eat it so that i could take a picture.
this was my second time attending a williams-sonoma cooking class. classes are always on saturday mornings at the location i go to. the pan-frying class my mother and i attended paid off in my kitchen so i think its fair to say i’ll be attending as many of the classes as i can. call ahead, reserve your own spot and at the end of the class you’ll get a 10% discount to use on anything in the store. i can’t wait to re-create the philly cheese steak omelette that was prepared for and then devoured by all the participants at the cooking class.
so – how did i make my spinach omelette?
this calphalon nonstick fry pan* would be ideal. any non-stick pan will do. turn your stove on to medium to medium-high heat. butter in the pan. swirl to coat the pan. leave it be while you do the next step.
bowl. crack eggs into bowl. however many you’d like. 3 goes a long way and in a medium-sized pan – fits & cooks up well. i used 5 left over egg whites from crème brûlée i made on valentine’s day and added one whole egg to the mix. salt & pepper. 1 tbsp of milk. whisk for 20-30 seconds… with a whisk. a fork won’t allow enough air to travel through the goo. don’t over mix your eggs – it will make them tough.
the butter in the pan will be foamy at this point. pour those eggs into the pan. grab a spatula. something that has some give to it. i have a favourite spatula from williams-sonoma that i use in my kitchen. don’t fuss around with the eggs too much. lightly pushing at the sides of the pan, loosening the egg and tilting the pan to allow the runny bits to fall below. i added chopped up spinach to half of the omelette once it was just a gooey centre, and proceeded to hold my breath as i attempted to roll the omelette up into a perfect package. i think i succeeded! what do you think? do you have omelette troubles of your own?
note: an asterisks indicates an item i covet, not one that i own. a girl can dream.
learn by doing – my first steak.
i know what good food TASTES like. i do. at times i like to think i have one of those “refined palates” they talk about. then i watch Hell’s Kitchen and see the blind food test and think otherwise. i feel as if a dinner party is in order to test out this blind tasting theory.
however, do i know HOW to cook food so that it tastes good?
Josh and many others have said a resounding – yes!
i’d say i’m decent, but could use more practice. there’s many things i’ve never attempted before out of fear of failure.
one thing that i’m learning to work on is confidence in myself. Josh and many others have also reminded me of this on many occasion.
– SO –
let’s start to change that shall we?
(yes, i’m forcing all of you to come along this cooking journey with me)
i grilled my FIRST STEAK EVER on the barbeque… or barbecue. do people really have a preferred spelling?
so why, at the age of 25, is this the first time i’m grilling a steak? well – meat in the past has… scared me. growing up we ate chicken. lots and lots of chicken. as many ways as you can think of. i remember having a roast turkey or chicken at grandparents houses, but always arriving after it had been cooked. i was rarely around any preparation, unless it was baking. i guess i was trusted more around measuring cups of flour that could be easily swept up than hot stoves and pans of grease. regardless, i steered clear unless it was already cooked. through the years my mind then forged some crazy thought that the touch, look and/or feel of raw anything was/is gross and nasty. further pushing me away from uncooked anything.
silly me. i know.
partly because i started writing a lot more and am enjoying it, and partly because with the move to a new apartment came a dishwasher (sing-any-song-really-loud-in-enjoyment-at-the-thought-of-dishwasher…because i am) i have this new-found energy to want to cook and bake everything. which then unfortunately comes with catching myself engrossed in a cookbook for 2 hours on the couch or – on the couch, surfing the internet watching food how-to videos. not spending one single minute in the kitchen. THE SHAME!
– SO –
i got off my bum, and put one of those how-to watching videos into practice. i figured a good place to start was the barbeque. something i always dreamt of being a master at, but never really having the resources ever to try.
Josh’s mom always had a fine cooking magazine lying around the cottage when we’d go and visit. (yes, i flip through a lot of magazines and love every minute of it, an obsession i blame on my mother) this is how i stumbled upon the informative how-to videos and why i ultimately went and grilled my first steak!
specifically watching “great steaks on the grill” under the “grilling how-to videos” section on the right of the fine cooking site once you click on the link. there are so many other videos to watch and if you know squat about barbecuing – i highly suggest watching them.
i let my steak sit out on the counter – i can’t remember how long, but long enough for it not to be fridge-cold still.
i patted my steak down with paper towel on both sides.
i peppered one side of my steak.
i salted one side of my steak.
flip and repeat.
i grabbed my trusty tongs, 2 plates (raw+once cooked), a dish towel (i always have one close by), and a container containing slices of zucchini (a favourite and not my first time cooking on a grill) which also provided me with a bit of oil for the grill. all set. i purposely did not bring down any utensils. this was going to be a one shot deal. no slicing until back in the comfort of my apartment.
i was awfully nervous setting the steak down on the grill for the first time. hearing that slight sizzle noise, following the videos advice on the placement – i mean really, who doesn’t want cute criss crosses on their steaks?! even better – calling them diamonds. i closed the lid as quickly as i could and vowed not to open it again until 3 or 4 minutes had passed. listening to the how-to video in my head, up on the roof top.
there was success all around. even cooked to my exact liking – medium well. between mohawk and myself, it was devoured ever so quickly even though he prefers a rare steak.
so how come when i invite two friends over, and cook for all four of us, i get 2 out of 4 steaks correct. grr…
practice practice practice.
don’t stop on me now good weather! i need another steak win!
© Becky Siddall and littlesiddallstudios 2012.
learn by doing – popcorn in a brown paper bag.
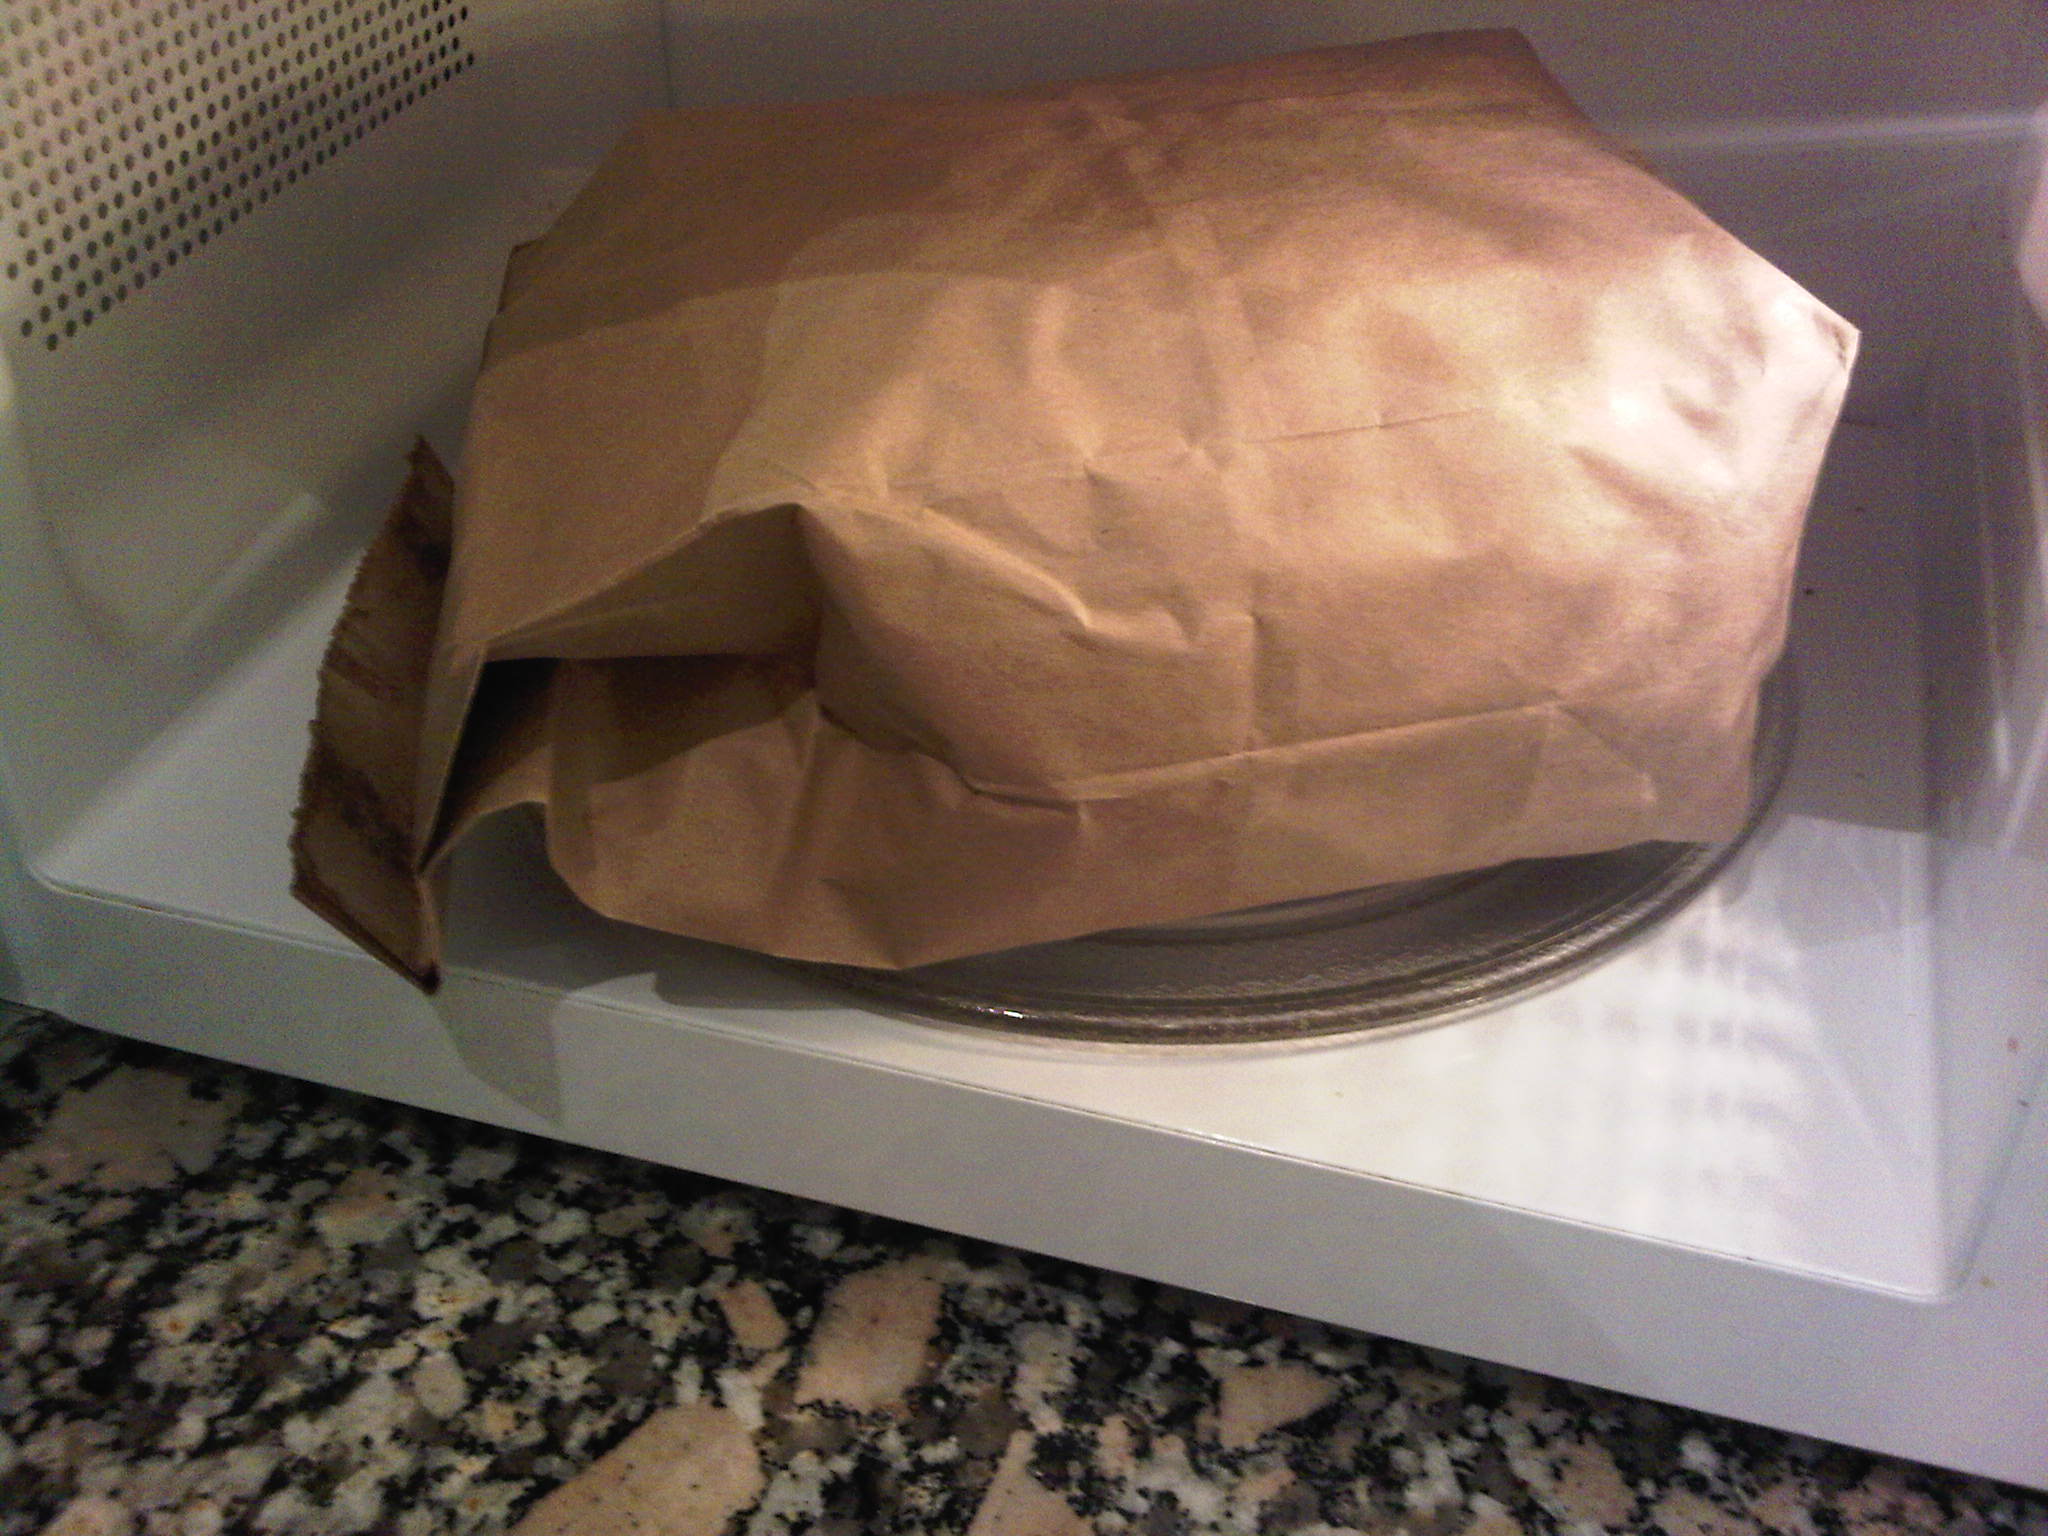


WELL GOSH DARN IT!
IT WORKED! IT ACTUALLY WORKED!
i have to admit that my jaw did drop. more than a little. same with mohawk. same with the friend i had over.
it just seemed a little… to simple to actually work. i mean, have you seen those microwave bags you get at the grocery store? i would need scissors to break into it at times if those handle side pull tabs didn’t work so well.
and the butter. lots of it.
or fake butter.
even if it says real butter… we know.
there’s just WAY TO MUCH OF IT! let’s cut down a little on all the fake crap shall we?
– SO –
the paper bags. (forget how much they cost, not much) the plain popcorn kernels. (3.99, at my local sobeys)
i carefully opened up the blog post in which i originally saw this. the lovely kerry k. taylor over at squawk fox has taught me many a good trick. this one seemed too good to be true. but i went for it. How to Microwave Gourmet Popcorn in a Brown Paper Bag.
just as kerry laid out ever so carefully step by step – wouldn’t you believe it – i had the same results! (my paper bag did start standing up like hers did, by the end of the microwaving it had fallen on its side, no big deal)
only thing i may change next time would be to splurge and see if the orville kernels taste better than grocery store brand kernels.
i urge you – go do it now. or don’t forget to leave yourself a little reminder for the next time you’re in the grocery store.
now you can have whatever flavour you want! and you can recycle the bag afterwards! how much did i put into the bag you ask? a half a cup! that’s it, that’s all!
my greatest do-it-yourself popcorn go-to seasoning is
– butter
– honey
– salt & pepper
mix and pour over popcorn – yum yum yum!!!!!! salty and sweet! so good!
thanks kerry k taylor over at squawkfox! i will never buy packaged popcorn again! go check out her blog, she has other yummy flavour topping ideas.
© Becky Siddall and littlesiddallstudios 2012.